DIY Kitchen Before and After — Our Budget Renovation
This post shares our DIY kitchen before and after photos and the best kitchen makeover ideas on a budget so you can update your kitchen to feel like home.

When we first walked into this house, there were chipmunks living in the kitchen. The room was outdated and definitely not somewhere you wanted to spend much time. We knew we couldn’t overspend in the kitchen given all the other updates the house needed. So we had to find a way to update the orange oak kitchen cabinets, work with the backsplash tile and laminate countertops, and figure out a layout that made the best use of the square footage.
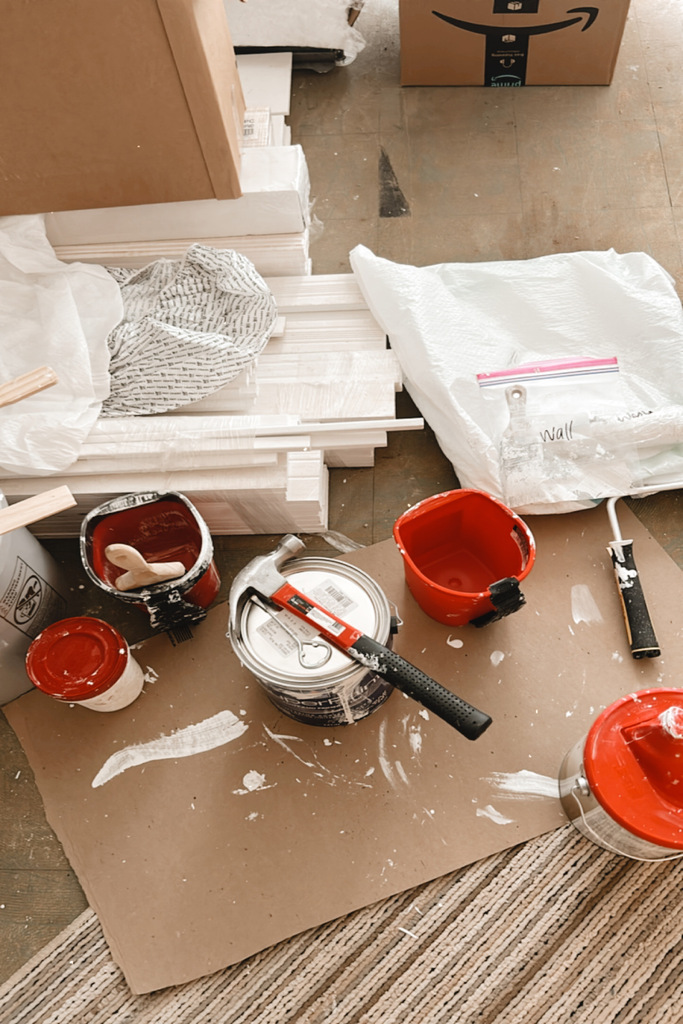
This was a DIY renovation, but we called in the experts to do some electrical, plumbing, and drywall. We were really grateful when the electrical work was done and the coffee bar was finally open. Instead of hiring an interior designer or contractor, and we put in a lot of work ourselves.
“We turned an orange oak cabinet kitchen with chipmunks into something calm and beautiful—no more carpet, no new cabinets, under $5,000.”
The most amazing part about this budget-friendly kitchen renovation was that we were able to totally transform our kitchen without ripping everything out or starting completely fresh. We started by assessing what we could keep and then made smart, budget-conscious choices that delivered a high-end look. The amount of sweat dripping from our brow felt like it was a major overhaul, but we were able to save a lot of money by working with what we had and being creative with rearranging the cabinets in a way that made more sense for the space.
If you’re a first time DIY renovator or you’ve tackled small kitchen remodel projects before, this post will show what’s possible when you’re working with a limited budget, but still want a functional, calm, and beautiful kitchen. Here’s the full before and after:
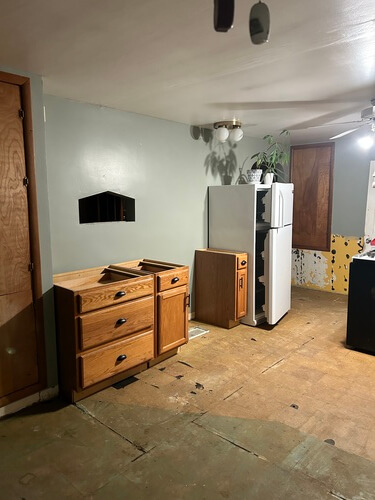
Our DIY Kitchen Renovation: Before Photos
The before matters because it shows what’s actually possible with a small budget. There were no new cabinets, no professional installation, and no natural stone countertops.
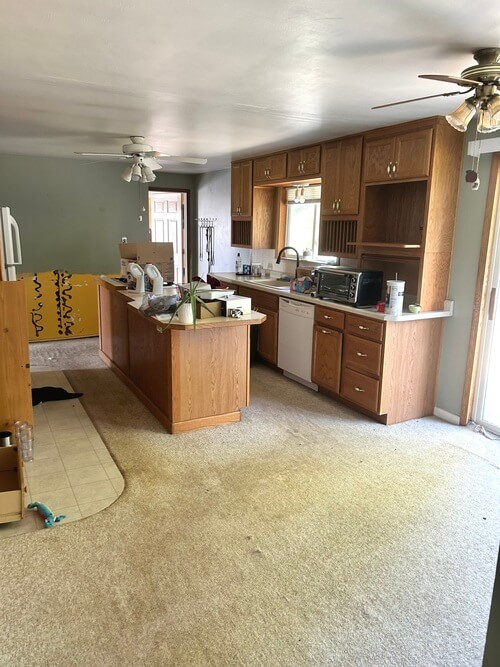
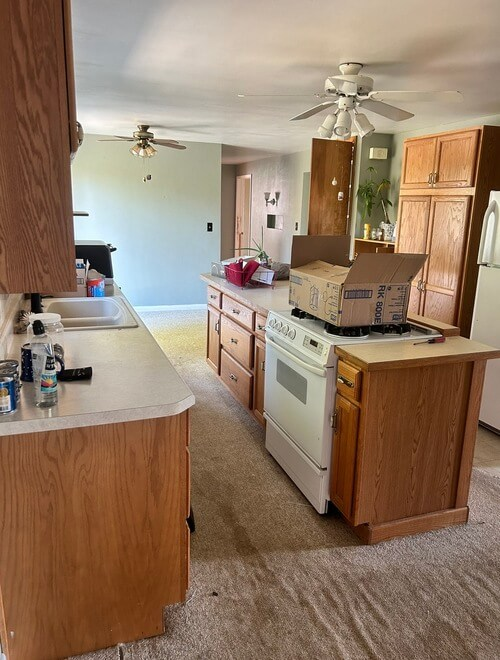
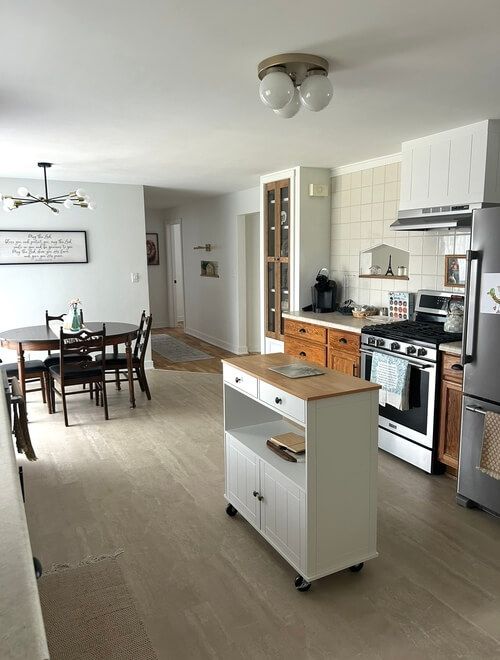
Instead, our kitchen had oak cabinets—the warm orange ones that came standard in kitchen renovations in the 1980s and 90s. One side of the kitchen had both upper and lower cabinets installed. Then there was a built-in kitchen island with cabinets that matched. But the opposite side of the room had random dressers and cabinets just pushed up against the wall, hiding a beautiful cutout in the wall that provided a window into the living room allowing more natural light to show through the house.
Based on the ceiling, the original dining room appeared to have been quite small. Although the house was built in the 1960s, at some point someone opened the kitchen to the dining room, creating a larger space that actually felt cramped because of all the cabinetry.
There were two built-in pantries that were not functioning well, but with potential to provide plenty of storage space. The countertop was original laminate in a neutral color and in decent condition. The flooring was…carpet. Yuck! We were able to paint one of the light fixtures gold, but the rest of the light fixtures, electrical outlets, and even the kitchen sink needed to be replaced. The only thing that wasn’t dated was the square footage, which was actually decent. It just wasn’t being used well.
The best news was that the old cabinets were structurally solid. And, this wasn’t a galley kitchen with real problems that required major structural changes. It just needed someone to commit to a direction. That’s the most practical way to approach a budget kitchen renovation—start with what you have, work with the existing layout, and make smart choices about where to spend and where to save.
Every Single Thing We Changed In Our DIY Kitchen Before and After
Here’s the complete list of budget-friendly kitchen updates we made, roughly in order:
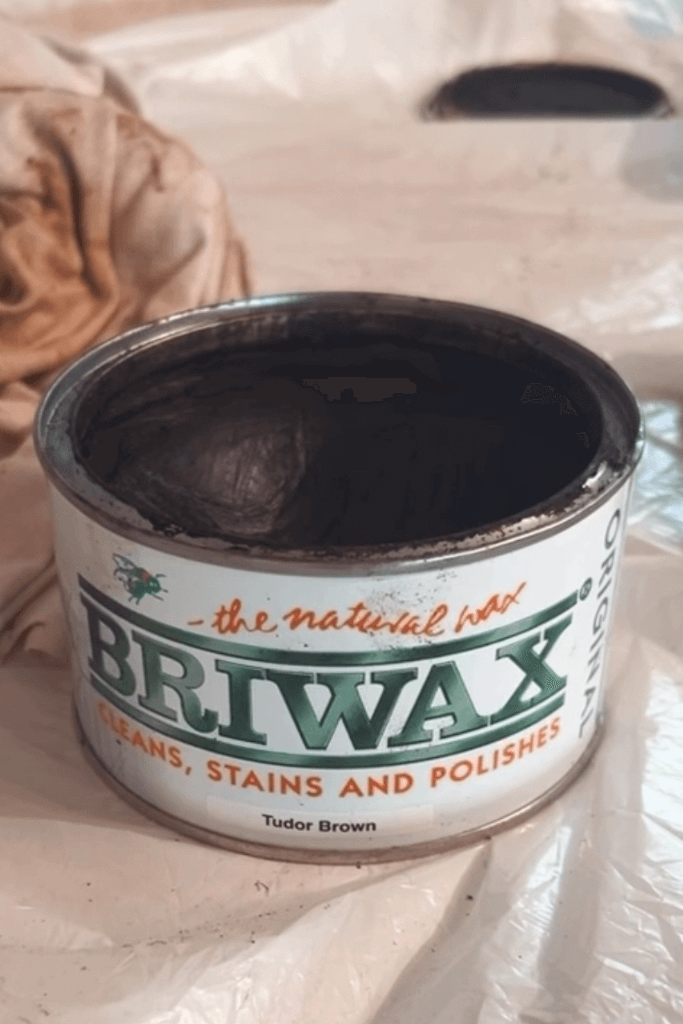
- Applied Briwax on existing honey oak cabinets in the Tudor Brown shade (you can read all about it here!)
- Updated all cabinet hardware to matte black drawer handles, cup pulls, and knobs
- Painted walls and ceiling Sherwin-Williams Pure White—a fresh coat of paint changes everything
- Matched the 6 x 6 off-white ceramic tile on the opposite wall
- Added vertical shiplap to a wall that had been covered in glue
- Moved the cabinets from the island to the opposite wall to improve the kitchen layout and make better use of the square footage
- Added a moveable island that matches the vertical shiplap look—you can get the same one here!
- Installed a matching laminate countertop—this ties the whole kitchen together
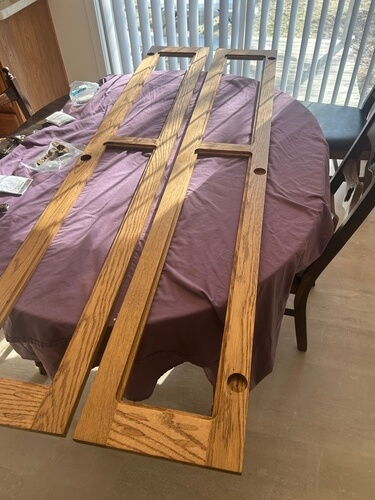
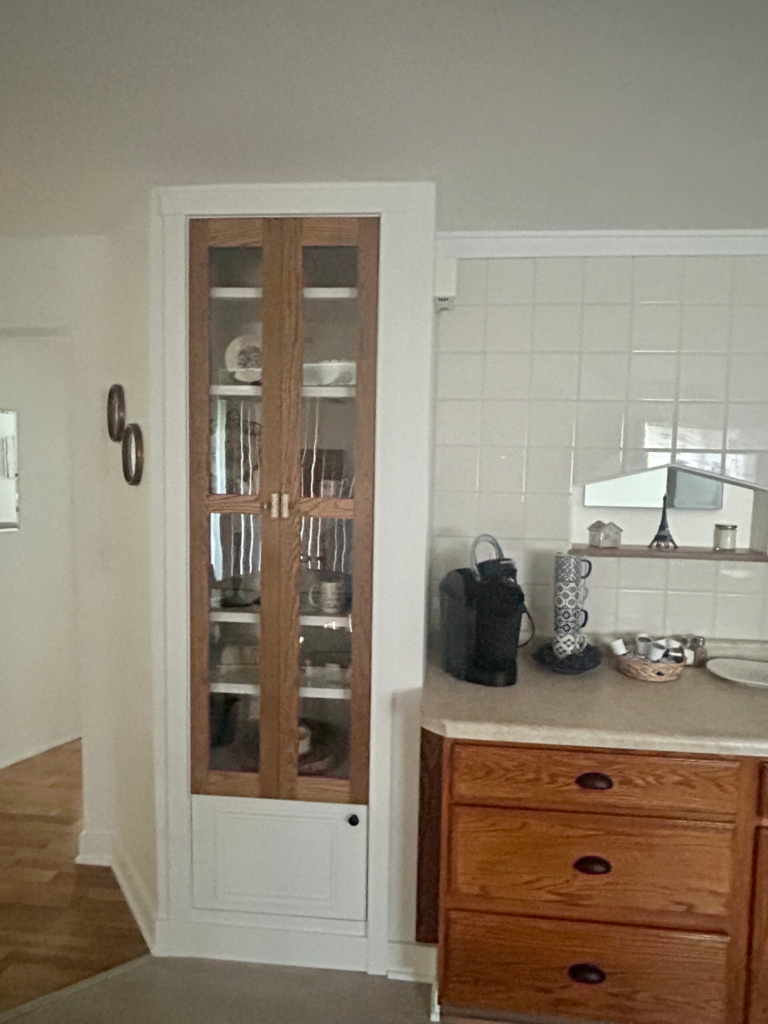
- Converted the pantry into a built-in china cabinet with a plexiglass door
- Updated pantry doors with decorative moulding
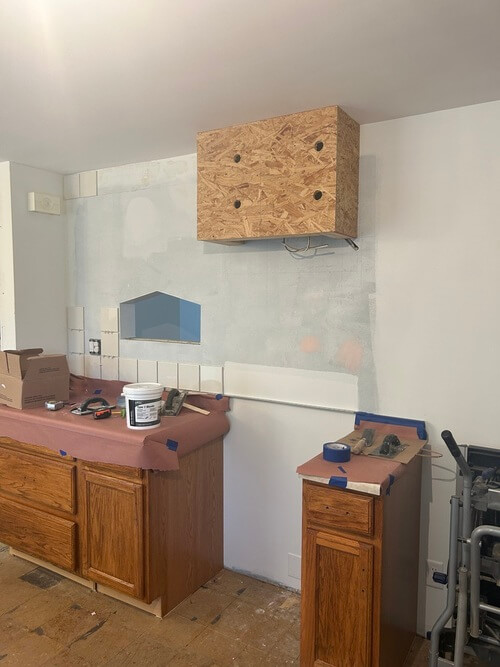
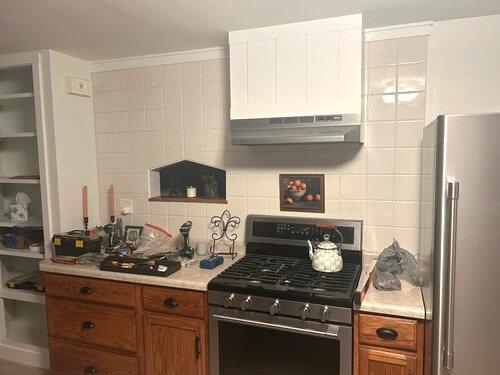
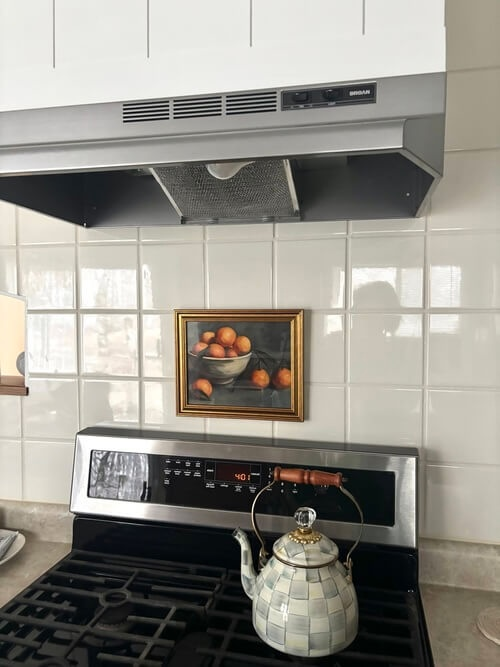
- Added a hood vent above the range to add a focal point to the kitchen
- Purchased like new stainless steel appliances
- Reused and added pendant lights and other light fixtures throughout
- Replaced all electrical outlets—a small detail with a big impact
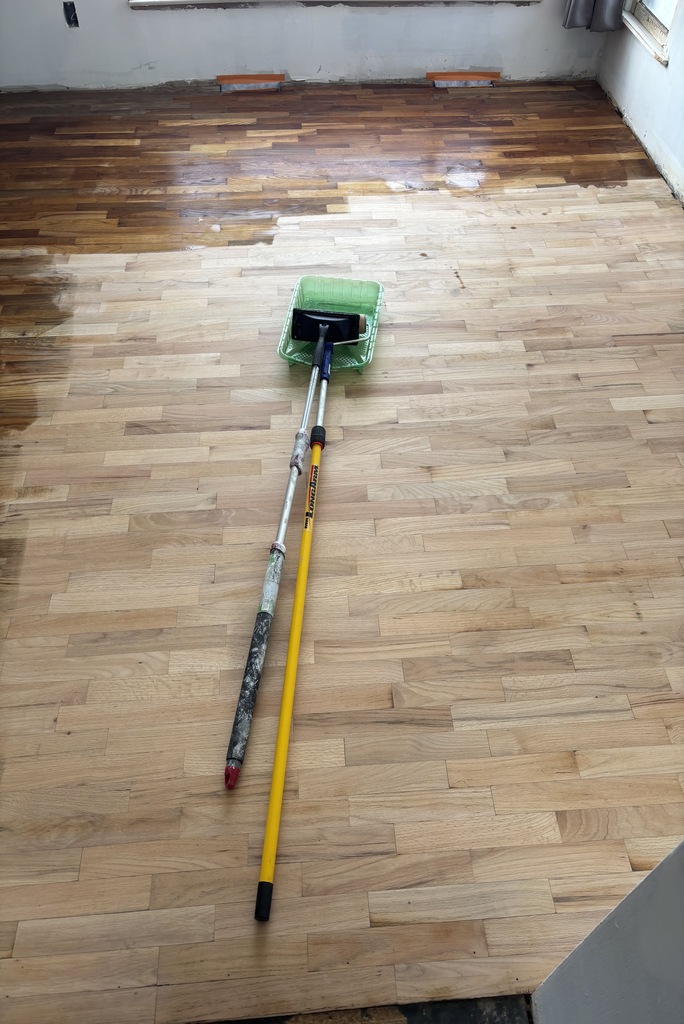
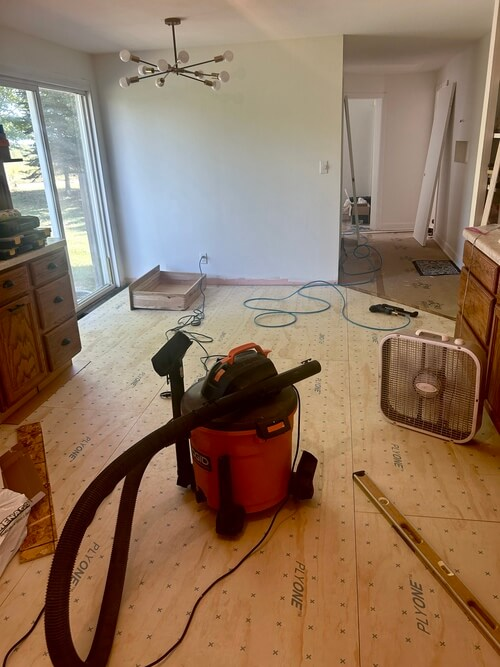
- Layed new travertine-looking LVT flooring
The flooring complements the original hardwood floors throughout the rest of the house. You can read how we refinished our red oak floors to look like white oak here!
Why We Didn’t Paint the Oak Cabinets and What We Did Instead
This was the most important decision in the entire kitchen renovation and one we pondered for a long time.
Our options were: paint the cabinet doors, replace with new cabinets, or find a cost-effective option that worked with the existing wood. We ruled out IKEA cabinets because the existing boxes were in great shape. We ruled out painting the cabinets because we’d seen too many painted oak cabinets chip and peel within a few years. And we ruled out new cabinets entirely because the budget didn’t support it and the old cabinets didn’t need replacing.
Instead, we used Briwax—specifically Tudor Brown—and it was one of the best decisions we made in this whole project. It’s a simple DIY project. Applied with 0000 steel wool, buffed with a soft cloth. No brush strokes, no primer, no peeling. The matte black hardware we added gave the whole kitchen a refreshed, modern look. Upper cabinets got the same treatment as the lower ones and the Briwax even looked good on the end panels which are pressed wood.
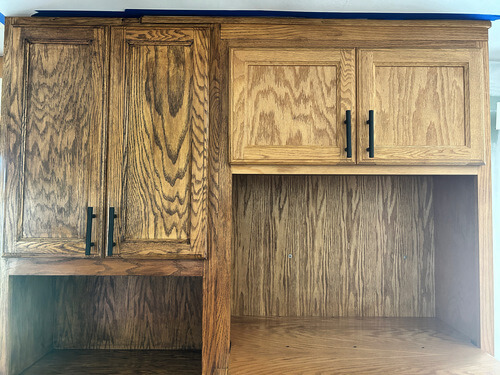
The result transformed the kitchen’s look without a complete overhaul. The orange honey oak tone deepened into a warm brown. The wood grain became more visible. Now when you walk into the space, you immediately exhale. It feels so calm and warm. The total cost for two tins of Briwax was under $100. You can read more about how we transformed our orange oak cabinets with Briwax here!
Briwax is a wax-based wood finish that deepens the tone of existing wood grain without paint, primer, or stripping, making it one of the most cost-effective options for updating oak cabinets without replacing them.
Want more budget-Friendly DIY TIPS like this? get EXCLusIVE CONTENT IN OUR NEWSLETTER.
Subscribe below.
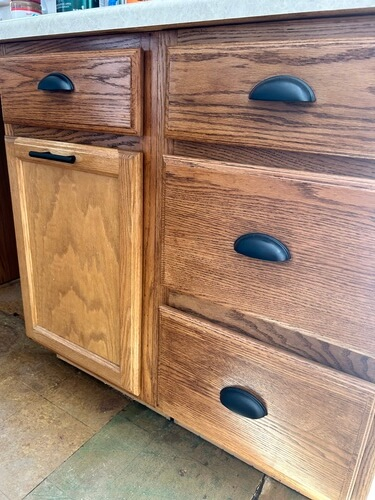
How Swapping the Hardware Changed the Entire Feel of the Kitchen
New hardware is one of the easiest ways to update a kitchen’s style and one of the most budget-friendly kitchen updates you can make. Our original hardware was small, brass-toned, and of its era. Replacing it was a simple DIY project that took less than an hour.
We chose matte black cup pulls on the drawers, handles on the cabinet doors, and simple knobs on the pantry doors. The contrast between the warm brown Briwaxed oak and the modern hardware is exactly the right combination for a clean, simple kitchen that doesn’t lean into any one style too hard. It’s a great way to achieve a high-end look at affordable prices without having to get new doors or all new cabinets.
We also think updated brass hardware like these would look amazing too!
Modern hardware does more work than most people give it credit for. It’s a small update that delivers a huge difference in the overall look. You can get the same ones we used to modernize our kitchen here.
Why Painting the Walls Ourselves Was the Highest Return Update in the Whole Kitchen
A new coat of paint is the most affordable way to change an entire kitchen’s feel, and if you choose a light enough color for the walls, you can also paint the ceiling the same color. This is one of the best money-saving tips for a kitchen remodel.
We used Sherwin-Williams Pure White on all of the walls. It reads as bright without feeling too sterile. It has a warm undertone that works beautifully with the oak wood tones and complements the matte black hardware.
Lighter colors on the walls also help a small kitchen space feel larger and bring in more of a natural light feel even when there’s limited window space. If you’re on a small budget and can only do one thing—a fresh coat of paint in a light color like Pure White is the most practical way to change how the whole kitchen looks and feels.
How We Added a Tile Wall on a Budget
Since we were saving money by not removing the upper and lower cabinets, backsplash tile, and countertop on one wall, we were able to find matching tile to add to the other wall. The tiles were 6 x 6 off-white ceramic which is a simple, classic tile that doesn’t try too hard and helps a space feel clean. Trying to figure out where to begin tiling a wall is a true test of your math skills. We highly recommend a cross-line laser level like this to help you maintain straight lines.
The ceramic tile adds texture to the backsplash area and reflects light differently than a painted wall does—it brightens the room in a subtle way that’s hard to achieve with paint alone. Subway tile is another cost-effective solution that is fairly easy to apply, especially if it is your first time tiling a wall.
Tiling our wall all the way to the ceiling helps draw your eye up when you walk in the door. It makes the kitchen feel high-end while being an affordable way to add a design element to a wall. If you want an even more affordable option, peel and stick tile in the backsplash area is a simple solution. Just keep in mind what your goals are for your home because it will not last as long and doesn’t make your home feel as finished.
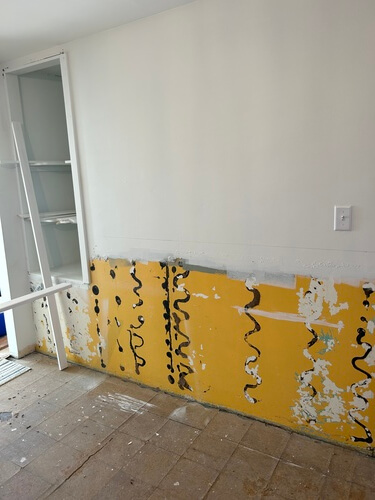
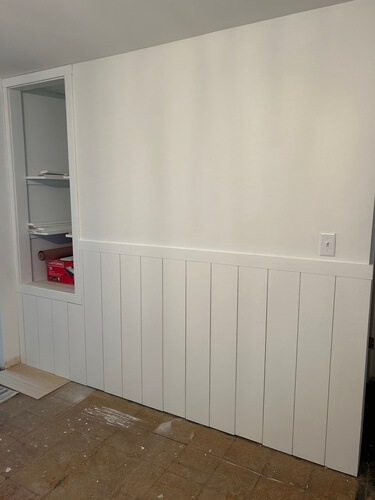
Why One Shiplap Wall Changed How the Whole Kitchen Felt
Renovating a kitchen on a budget means finding creative ways to solve problems. Since one of our walls had paneling with glue that ruined the drywall, we decided to apply vertical shiplap, painted Pure White to match the rest of the kitchen. This is one of those simple DIY projects that looks expensive, takes a day or two to install, and adds a lot of character to the overall look of the space.
Vertical shiplap also draws the eye upward, which makes a small kitchen feel taller and gives it a more spacious feel without changing the square footage at all. Horizontal shiplap can lean toward a modern farmhouse kitchen remodel aesthetic that doesn’t suit every kitchen’s style whereas vertical shiplap is a more versatile design choice that works in a clean, simple kitchen as well as a more rustic one.
This was one of our favorite simple updates in the whole renovation. It added visual interest to a wall that previously had nothing going on, and we were able to use the leftover materials to create a matching hood vent that further ties that room together.
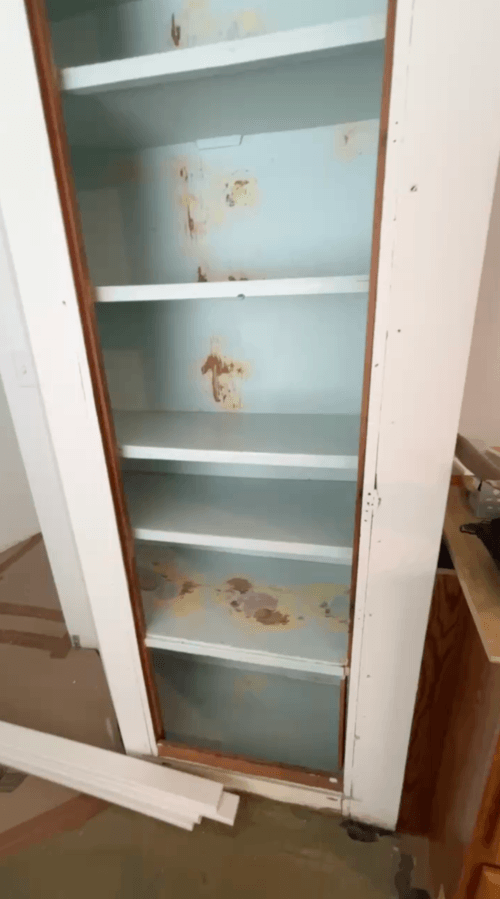
How We Turned a Hidden Pantry Into the Best Feature in the Kitchen
This is the one that surprises people most when they see the before and after, and it’s the change that makes the whole kitchen feel custom.
The original pantry had a long door that was too heavy for its hinges. Since the kitchen already has plenty of storage, we decided to paint the interior shelves in the cabinet white and add custom oak doors that match the cabinets with plexiglass inserts so the pantry. This way the pantry could be used like a built-in china cabinet.
With open shelving behind a plexiglass door, we can now safely display our dishes and tchotchkes. When your home is an extension of you, the heirlooms you acquired, and the beautiful pieces you have found along the way, displaying them is a great way to add decor inspiration to a kitchen that might otherwise feel purely functional.
The china cabinet is now one of the first pieces you see when you walk through the door. It was one of the fastest DIY projects with one of the biggest impacts.
Why We Chose Laminate for the Countertops and LVT for the Floor (and Don’t Regret It)
New countertops are one of the most expensive kitchen updates if you choose natural stone or quartz. We chose laminate because the existing kitchen countertop was neutral so it was the most money-saving solution that worked with the rest of our design decisions.
The great news is that modern laminate countertops look dramatically better than they did even a few years ago. They’re a cost-effective option that work in a functional kitchen that gets real daily use. Butcher-block countertops are also a great budget-friendly option that work beautifully with oak cabinets and add warmth to any kitchen.
Once we knew we could match the countertops, we knew we wanted a stone-looking floor to play with the natural wood cabinets and neutral tones. Laminate vinyl tile (also known as LVT) flooring in a travertine design turned out to be the perfect option. We also saved a lot of money because installing it was another DIY project.
The Details That Finished the Whole Kitchen
We decided to add a hood vent to give our kitchen a focal point on the blank wall. Adding one made the whole cooking area feel like a real kitchen rather than just a room with appliances in it. Now our kitchen is a thoughtfully designed space that looks beautiful and is much more functional.
We chose stainless steel appliances that work with the clean, simple kitchen aesthetic without fighting with the warm oak cabinets or the matte black hardware. We found our appliances used online at a great price.
The lighting fixtures are one of the small details that make a big impact. We repainted one of the original fixtures gold and added a sconce light over the kitchen sink and a new light fixture over the dining table. A dark kitchen feels smaller and less welcoming no matter how much work you’ve done on the walls and cabinets.
The electrical outlet swap is the detail nobody talks about but everybody notices. Old painted outlets make a white kitchen feel dated even after everything else is updated. New white outlets and outlet covers cost almost nothing. It’s one of the easiest ways to add a fresh look to a kitchen.
The new kitchen sink was the final simple update. We got a black sink for free and since our faucet was already black, it was all a perfect fit with the hardware.
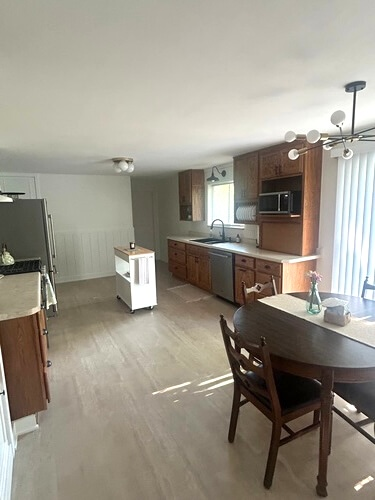
Our DIY Kitchen Renovation: After Photos
The total cost of a complete kitchen makeover like this costs between $3,500 and $5,000 depending on appliance choices and how much of the work you DIY versus hire out. That’s a major upgrade compared to what a full kitchen renovation with new cabinets and natural stone countertops would cost—which can easily run $10,000 to $30,000 or more with professional installation.
The simple changes—Briwax on the oak cabinets, matte black hardware, fresh coat of Pure White paint—cost a fraction of what most people spend on a complete demolition. Everything else was a smart choice made one decision at a time.
What Actually Made the Biggest Difference — Ranked In Order
If you’re planning a DIY kitchen renovation on a small budget and can only do a few things, here’s how we rank the best ways to spend your money based on what delivered the most impact in our kitchen:
- Briwax on oak cabinets — the single best go-to kitchen renovation idea for anyone with honey oak
- Modern hardware — small change, huge difference in the kitchen’s look
- Fresh coat of paint — the most affordable way to change everything
- New laminate countertop — a modern design for a fraction of the cost of stone or quartz
- New flooring — goes a long way toward the overall look
- Pendant lights — good lighting made the whole kitchen feel alive
- Electrical outlets — the small detail that completes the fresh look
- Faucet and kitchen sink — worth updating if the current ones are old
- Ceramic tile wall — simple, timeless, inexpensive way to upgrade a wall
- Vertical shiplap on a wall — great way to add character at low cost
- Pantry converted to built-in china cabinet — the biggest impact on making a kitchen look custom
Budget Breakdown: Total Cost of Our DIY Kitchen Renovation
Here’s roughly where the money went in our DIY kitchen renovation:
| Items: | Cost: |
| Briwax and supplies | $80 |
| Matte black cabinet hardware | $50 |
| Paint (walls, trim and ceiling) | $200 |
| Ceramic tile and installation supplies | $90 |
| Laminate countertops | $200 |
| Laminate flooring including underlayment | $1000 |
| Vertical shiplap and installation supplies | $300 |
| Hood vent & shiplap | $170 |
| Pendant lights and fixtures | $90 |
| Electrical outlets & covers | $20 |
| Used stainless steel appliances | $1000 |
| Built-in pantry supplies | $200 |
| Electrical, plumbing, drywall repair | $500 |
| Screws, vents, tape, the “extras” | $100 |
| TOTAL: | $4000 |
Budget planning matters more than any single decision in a kitchen renovation. Knowing your total cost ceiling before you start is the smart way to make every decision that follows.
Budget-Friendly Alternatives If You Have Even Less to Spend
Not every kitchen renovation needs to cost $4,000. Here are some affordable ways to update a kitchen’s look on a truly small budget:
- Contact paper or peel and stick tiles on the backsplash area — a simple solution for renters or anyone not ready to commit to real tile
- Stick tiles on the floor — a practical way to update old flooring without the cost or labor of real laminate
- Replace the cabinet doors only — a great way to save money but upgrade the overall look
- New hardware only — matte black drawer pulls like these can completely change the kitchen’s style for under $50
- New coat of paint on the walls — the single most affordable way to update a kitchen
- Replace the countertop — a modern laminate design will freshen the space instantly
Kitchen makeover ideas don’t have to be expensive. Small changes made little by little go a long way toward a fresh look that makes even a small kitchen space feel intentional and updated.
Click here to see the products we used to update our kitchen on a budget!
Want more budget renovation ideas like this? get money-saving tips in our newsletter.
Subscribe below.
Frequently Asked Questions